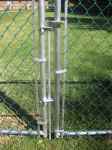
How to Install Chain Link Fence Hook Ties
Chain Link Fence Installation Manual
Shop: Chain Link Fence | Fence Tools
Read More: How to Install Chain Link Fence (PDF) | Chain Link Installation Tutorial (PDF) | Chain Link Fence System Overview
Jump to Preferred Section:
Before You Begin:
Step 1 - Obtain necessary zoning and building permits. There may be local zoning or deed restrictions pertaining to height and type of fence and/ or gate. Check out property line setback requirements. Find surveyors pins if the fence is to be located near property lines or have the lot surveyed.
Step 2 - Measure fence footage and locate gate placement.
Step 3 - Call 811 before you dig. Notify your local or state utilities protection service to locate potential buried utilities. There is usually no charge to locate utilities, however a hefty charge could exisit for repairing buried utility lines, not to mention a potential injury to yourself.
Step 4 - Purchase your Chain Link Fence from HooverFence.com.
Tools Needed For Installation:
Post Setting/Layout Tools:
Chain Link Stretching Tools:
Unwrapping and Inspecting Fence Shipment:
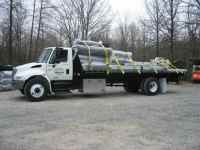
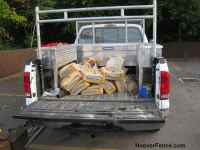
Prepare for your HooverFence.com fence delivery. Chain link fence orders can arrive on small and large trucks, covered trailers and flatbed fence trucks. Forklifts are usually not required, however be prepared to hand unload fence tubing, rolls of chain link, bags and boxes of chain link fittings.
The first thing we recommend is that you carefully unwrap and inspect your shipment to verify that you have all of your materials. Make sure to go over and read all of the instructions at this time. While the installation of the fence is relatively easy, this online instruction guide should eliminate any guesswork. If you have any questions or problems installing the fence, please give us a call.
Read More: Shipping Policy.
Establish Fence Lines:
You will establish the future fence line by using the stakes and string to stake out the area to be enclosed.
Step 1 - Drive stakes a foot or two away from where you want corner and end posts to be located; this will allow you to drill/ dig holes without obstructions. It may also allow you to 'drop' the string while excavating for fence post holes. Be careful not to bump or move stakes. If you remove the string to excavate holes, take care to restretch the string line back the way it was prior to removing.
Step 2 - Stretch masonry guide string tight between these stakes. This string will represent the location of the fence and serve as a guide string as you set posts. Posts will be set in concrete or driven 1/8-1/4" from string line.
Step 3 - Intermediate stakes may be required for longer stretches of fence. Be sure to pull string taut as string which sags or moves with the wind will cause posts to be set incorrectly. Keep in mind, the fence can only be as straight as the guide string.
Step 4 - Locate gate posts first and mark their location with upside down post hole marking paint. Next measure each stretch of fence. Chain link fence posts are typically spaced a maximum of ten feet apart. For aesthetic reasons, space posts evenly, but do NOT exceed ten feet between posts. If you plan on installing privacy slats or another type of material that will increase wind load, consider using 8' or 6' post spacing. Also consider upgrading the framework, i.e. posts and rail to a larger diameter and thicker wall thickness. Heavier chain link framework such as HF20 and/ or HF40 are excellent choices for use with chain link fences with aluminum diagonal or PVC privacy slats or privacy screening.

Marking Paint

Post Location
Creating Square Corners Using the 3-4-5 Method:
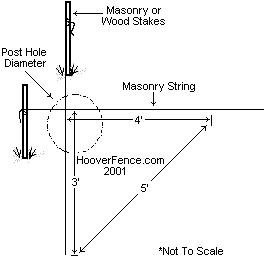
Step 1 - Stretch string down the two adjacent sides as shown in drawing.
Step 2 - Measure and make mark 3' down on one line.
Step 3 - Measure and make mark 4' down on other line.
Step 4 - Measure diagonally between the two marks and adjust lines to achieve 5'.
Note: For greater accuracy, use measurements in multiples of 3-4-5, such as 6-8-10, etc.
Setting Posts:

Typical Post Layout
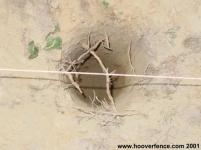
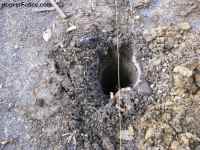
Correct Post Hole Shape
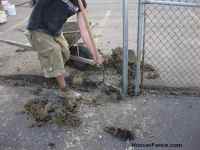
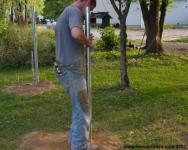
Step 1 - Depending on the geographical location, fence height, and fencing materials used, post hole size may vary. In general for residential chain link fences, dig holes 6" in diameter by 30" deep (or below frost line in your area). Another rule of thumb is to dig the holes three times the diameter of the post, i.e. a 2" diameter post would require a 6" diameter hole, and put one third of the height of fence that's above ground - in the ground. Typically gate post holes are dug larger in diameter and deeper to withstand the additional stress of a moving gate. The guide string may be removed temporarily prior to excavating to prevent cutting it. Be sure to replace it as it was originally stretched.
Chain link fence posts holes can be dug by hand with post hole diggers and spud bars, small gas powered augers, or skid steers with hydraulic augers. Size your auger bit accordingly to the height and grade of fence materials to be installed.
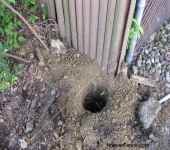

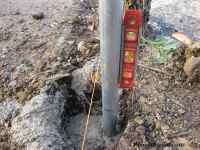
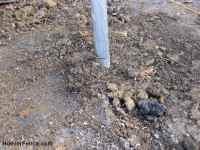
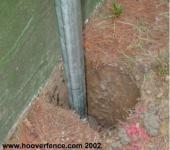
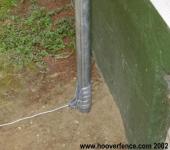
Holes next to buildings often must be dug by hand. Take caution as drain pipes and other utilities can be located near foundations.
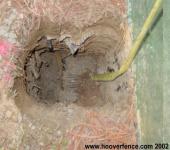
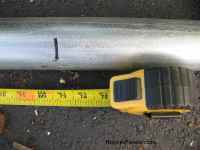
Some obstructions such as the one above can be difficult to deal with. A post may be bent in this case to miss the pipe. Measure the depth of the bend first.

Notice how the post remains tight to the house, yet is still dug to depth with a sufficient concrete footer.
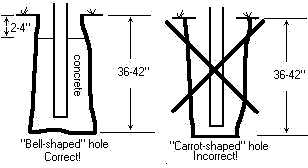
Step 2 - Restretch guide string and check holes for accuracy visually and/or by placing a post in the hole and plumbing in all directions. If the hole needs 'shaved' or moved, do it now. If holes are shallow because you hit an object you can't remove, 'bell' the hole at the bottom. To 'bell' a hole, use a post hole digger and/ or spud bar to make the bottom of the hole larger than the top. This further anchors the concrete footer which will support your fence. 'Belling' will compensate for holes as shallow as 18" deep. If necessary, move the hole slightly to miss any obstructions. This will change your post spacing. However, there is no harm in the case of line posts. If you must move it more than a couple of feet, consider installing an extra post midway in the enlarged space. Other ways of dealing with obstructions include bending posts below ground and welding plates on to posts to secure to large rocks.
Check hole location prior to filling with concrete mix. The hole should not be centered perfectly under string line; it should be offset slightly so that the post will be centered in the concrete footer. If necessary put post in empty hole and check plumb with a level. The post should be plumb to the string with approx. 1/8-1/4" clearance. If not, fence post hole will need 'shaved'.
Once fence posts holes have been dug and cleaned out, check that each and every hole is in the correct spot. If you cannot tell visibly, place post in hole and plumb post. Post needs to sit plumb and be placed 1/8"-1/4" off the string line.
Fence Tip: Be sure to dig fence post holes to the proper depth and diameter for your region. Northern regions have frost depths deeper than the southern part of the country. 30-36" deep concrete footers suffice for most fence installations.
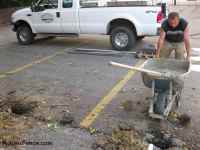
Step 3 - Mix concrete with water using pre-mixed bag. Go easy on the water. Mix should look like thick gray mud, not like Mom's watered-down chili. If it doesn't pile up on the shovel, it's too thin; add more mix to dry it up. If you are mixing from scratch using aggregate like gravel, limestone or sea shells, concrete sand and Portland cement, mix 3 to 4 parts (shovels) of aggregate to 2 parts sand and 1 part cement.
Smaller fence projects are often set using a premixed bagged concrete. Often sold at do-it-yourself stores, 40, 60, and 80 pound bags are usually readily available for your fence project. Figure your fence post concrete requirements by using HooverFence.com's concrete calculator.
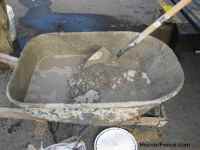
Premixed bags of concrete may be mixed by hand in a wheelbarrow with a shovel, or with a gas powered, or electric powered cement mixer. Mix concrete to a 'thick milkshake' like consistency. Do not mix too wet, or the soup-like texture will cause posts to sink, or the concrete may not set at all.

For small chain link fence jobs where the job can be set and stretched in the same day, using a small amount of Quik Rok, or other brand of fast setting hydraulic cement with regular premix cement can save time and an extra trip to the jobsite.
Quik Rok, fast setting hydraulic cement is available in 5 gallon pails and is a powder like material that can be used alone for small holes (core drilling in cement). You can also mix about a shovel full of this baking flour like material in with a wheelbarrow full of regular cement.
Fence Tip: Some fence spec jobs require concrete footers to be poured to the top, capped and trowelled. Use a pointing trowel for better appearance.
Step 4 - Mark post grade mark. End, corner and gate posts should be marked at the height of the fence plus 1 inch; 49" for a 4' fence, 61" for a 5' fence, etc. Mark intermediate or line posts at height of the fence minus 3 inches; 45" for 4' fence, 57" for 5' fence, etc. When you add your line post cap and top rail, the height will be accurate. Grade marks represent the bottom of the fence and are essential in setting posts to the correct depth. If you bury the post hiding the grade mark by 1", you will need to trench to bury the fence here. If your grade mark is above ground by 3", your fence will be off the ground by three inches and you better plan to cut it off later or fill under the fence if a tight fit is necessary.
For chain link fences, line posts (intermediate posts) should be marked with a grade mark at 3" less than the height of fence being installed. Here a 6' high fence is being installed. Line posts are marked at 5'-9".
Fence Tip: Vinyl coated chain link fabric is more elastic than galvanized mesh and can 'shrink' slightly when stretched. Subtract an additional 1/2" if you're setting posts for a fence with vinyl coated fabric.
For chain link fences, terminal posts, i.e. end posts, corner posts, and gate posts, are marked at 1" more than the height of fence being installed. For a 6' high chain link fence, mark posts at 6'-1".
Fence Tip: Place a spare piece of tubing, or post that has not yet been set on the top of gate posts after setting and level these posts to one another. Gates are usually perfectly square.
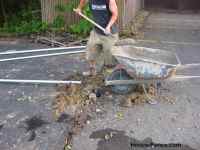
Step 5 - Fill holes with wet cement. Do not fill too many and risk having the concrete cure before you can 'stick' your posts. Do not fill holes to the the top with concrete, leave the concrete down 3-4". Filling the hole completely with cement is a common mistake. If this is done, water will collect under this 'lip' of concrete. When it freezes, the ground will literally squeeze the concrete footer and 'heave' the post up, much like squeezing a tube of toothpaste.
Once fence post holes have been dug and cleaned out (be sure to clean out post holes of loose dirt and debris), shovel cement into holes until they are near full. Leave cement down from the ground surface (grade) approx. 3". Holes should also be larger in diameter at the bottom than at top, 'bell-shaped'. Holes shaped like a carrot can heave prematurely.
Fence post holes can be filled practically as fast as the cement batches can be mixed and poured. Often another person can follow the person filling the holes and 'stick' the fence posts. 'Sticking' fence posts simply means putting the posts in a hole that has already been filled with cement, plumb and tight to the string line.

Fill post holes with concrete mix. Do not fill holes completely. This may cause posts to heave prematurely.
Step 6 - Stick Posts. Most chain link posts can be installed by actually pouring the cement in the hole first and then 'sticking' the post in the wet cement. Simply push the post into the cement mix in the center of the hole. Set terminal posts as tight to the string as possible without touching the string. Set line posts approx. 1/8"-1/4" off string. This will account for the differences in fence post diameters. Another way of setting posts is for one person to hold the post plumb to the string line while another shovels concrete mix around the post. The first method explained is actually easier, a more efficient way of setting fence posts, and assures there is concrete around the post, under it, as well as in it.
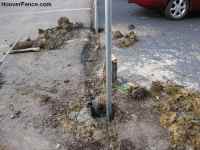
Chain link fence posts should be 'stuck' down to their respective grade marks and plumbed with guide string. Backfill with loose dirt and step gently on dirt surrounding posts to help hold them too height. If posts sink on you, concrete is too wet, or holes have filled with water.
You can and should put your posts in their holes and check them to the string line with a level if you're not sure post holes have been dug in the right spot. It can be very frustrating if holes have not been checked for accuracy, then filled with cement. You'll find yourself trying to stick posts into the dirt surround the dug hole, but buried in cement. If this happens, pull post, redig hole, and try to catch up with your crew!
On sloped terrain, it is sometimes necessary to set posts intentionally high, with grade marks exposed. The chain link height is actually taller when measuring diagonally. If in doubt, measure square with grade to help gauge your finished height of the fabric. Chain link is remarkably versatile and can be installed on any terrain.
Fence Tip: When in doubt, leave post high and cut off later. This is much easier than trying to extend the height of a chain link fence post!
After chain link fence posts have been 'stuck', check cement level is correct. You should put more cement in if concrete levels are too low.
Fence Tip: Avoid pushing away your guide string to fill holes with cement if another is using it to 'stick' posts!
Set posts to the depth of the grade mark first. Be sure to set fence posts tight to any buildings if animal containment is important.
Step 7 - After setting each post to grade, backfill with dirt and step on the backfill to hold the post to height. Repeat for all posts in this length of fence.
After 'sticking' post in hole with concrete mix, backfill with loose dirt. Plumb post while stepping on dirt around post. This will help hold the post plumb in the hole.
Step 8 - Sight posts. To 'sight' in posts, stand at end of length of fence and look across the tops of the posts. Adjust heights of posts as necessary to account for gradual slopes and changes in grade. The goal is to have smooth transitions between posts and to avoid sharp changes. This is easiest for two people to accomplish: one persons sights posts while the other adjusts and checks for post plumb. Be sure to check plumb on each post after adjusting and watch the grade mark as noted above.
Once posts have been set to grade, sight across the tops of the set posts and raise or lower them slightly to smooth out the top of the fence. Keep in mind, if you bury your grade mark slightly on one or more posts, plan to trench this same amount for the chain link fabric. The grade marks represent the bottom of the chain link fence. If your grade mark is 4" off the ground, so will be your fence and you may be filling underneath.
Note: Although most fences are simply installed to grade, or flow with the contour of the land, some applications would be better set perfectly level, i.e. tennis court enclosures, basketball court enclosures, baseball and softball backstops, sideline fences, and homerun fences. If excavating, grading, or asphalt/ concrete is to be poured later, or is already in place, the fence may need to be installed perfectly level. If this is the case, sighting with grade marks, using a string line with a level, or a transom will help immensely.
Step 9 - Install gate posts with the exact opening size as recommended by gate supplier or manufacturer. The opening size is the distance between the two gate posts, inside to inside. If possible make the tops of gate posts level to each other by placing a post across the tops of the posts and checking with a level. If the ground slopes off sharply under the gate, set the gate posts to grade. It won't look proper to make them level.
Step 10 - Let concrete cure for at least 24 hours prior to continuing work.
Installing Post Fittings:
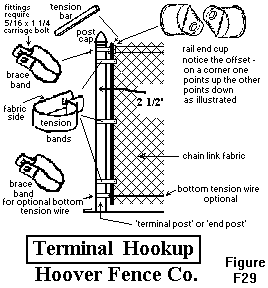
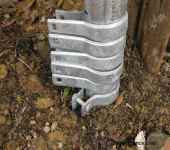
Typical Terminal Post Fitting Diagram
View of bottom brace band for bottom wire, and four tension bands for a 5' high chain link fence. View is from the inside of fence. Notice tension bands are offset so that the flat side is facing out.
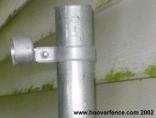
End post with brace band bolted with a rail end cup. All nuts face towards the inside of the chain link fence enclosure.
Combo rail end cups (with holes in them for truss rods) may be used for top rail, mid rail, and bottom rail to connect fence rail to terminal posts.
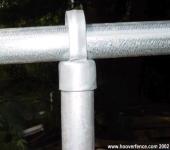
Proper installation of rail end cups and brace bands for a chain link fence corner post. Notice one points up, the other down. This allows top rail to remain even at such a junction.
One chain link brace band with nut and bolt and 5 tension bands are used for a 6' high chain link fence.
Here barbed wire arms are used as loop caps for a 6' high plus 1' of barbed wire chain link fence.

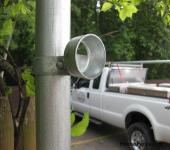
Loop caps simply slide on top of posts. Top rail slides through horizontally.
Step 1 - Place tension bands on end and corner posts.
Step 2 - Quantity of tension bands per hook-up = height of fence minus one; minimum of three. For example, a 4' high chain link fence requires three tension bands per hook-up.
Step 3 - A hook-up is each connection of chain link to an end or corner post. End posts have one hook-up; corner posts have two hook-ups.
Step 4 - Place one brace band on first to use if bottom tension wire will be installed. This fitting requires one 5/16" x 1-1/4" standard fence bolt and nut. Install nut and bolt loosely.
Step 5 - Next, install tension bands. The tension bands are offset. The offset (flat side) faces 'out', the same side as the chain link fabric will be installed. This is normally the outside of the enclosed area. Do not install nuts and bolts on these.
Step 6 - Place one brace band per hook-up over the tension bands . This fitting requires one rail end cup, one bolt and nut. This band and cup will be used for the top rail. Tighten with a ratchet and socket.
Step 7 - The rail end cup is offset also. This offset can be up or down on an end post. Regardless of if you choose to position the cup up or down, be consistent. On a corner, since two sets of brace bands and rail end cups must share the same space, the bottom rail end cup is to be offset up and the bottom rail end cup is to be offset down. This enables the two cups to be level to each other, so your top rail can be inserted into the cups and be level to each other.
Step 8 - Typically all nuts are kept on the inside of the fence; this prevents someone on the outside from removing the nuts easily. For high security applications, the threads on the bolt may be 'peened' to prevent easy removal. This can be done by using a hammer and chisel and distorting the threads on the bolt so the nut can not be removed.
Step 9 - Place post caps on posts. The end and corner post caps are simple. There is only one way to install them. The loop caps, as they are called, are offset, if you look at them carefully. The offset side faces the outside of the enclosure; the same side as the chain link will be installed. Chain link loops caps are available in aluminum, or pressed steel with a galvanized finish. If barbed wire is to be installed, substitute barbarms in lieu of standard chain link fence loop caps. Chain link 3-Wire barbarms are available in as 45 degree barbarm, straight vertical barbarm, and an adjustable barbarm. We also carry a 6-wire barbarm.
Fence Tip: You may 'pre-squeeze' bands after they have been slid on to posts. This is done by essentially pinching brace bands and tension bands with a pair of fence pliers. Make sure you keep bolt holes lined up as you squeeze the bands shut. Later, when you are connecting the roll of chain link to the terminal posts, you will be thankful bands have been pre-squeezed as they will now allow you to fit your 5/16" x 1-1/4" nut and bolt through and thread the fence nut much easier.
Installing Top/Bottom Rail:
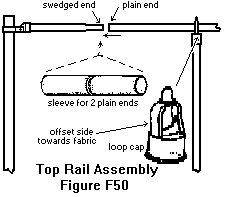
Typical Top Rail Assembly Diagram
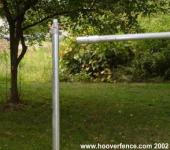
Loop caps simply slide on top of posts. Top rail slides through horizontally.
Offset of loop cap faces 'out'. This helps keep the framework flush to the fabric side of the chain link fence.
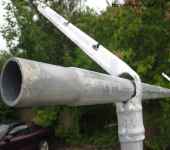
Top rail sits on top of line posts and runs 'to' terminal posts.
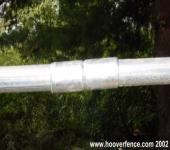
1-3/8" and 1-5/8", common sizes for top rail, are available swedged or plain end. Plain end top rail requires sleeves as shown above.
Chain link fence top rail with plain ends will require top rail sleeves. HF40 heavy industrial top rail is only available with plain ends.
HF20 top rail and lighter is available with a swedged end, a sleeve will not be required.
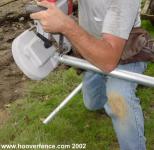
A hacksaw, chop saw, sawzall, pipe cutter, or portable band saw are used to cut top rail.
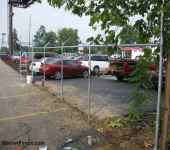
Chain link fence with top rail finished. Once framed, chain link fabric may be stretched.
Step 1 - Slide top rail through a couple loop caps and butt end firmly into rail end cup. Adjust height of rail end cup if necessary. Tighten rail end cup firmly.
Step 2 - Some top rail has a 'swedged' end, which tapers down so it will fit into another piece of rail. Fit the non-swedged end into the rail end cup at the end or corner post.
Step 3 - Add sections of rail, sliding each non-swedged end into a swedged end. Be certain to push rails toward your beginning point to 'seat' them all the way into each other. Push firmly. If the top rail has no swedged end then you need a 'sleeve' that acts as a coupling.
Step 4 - Add additional top rail until you reach the next terminal post, i.e. end, corner, gate post.
Step 5 - Cut excess rail off with hack saw or pipe cutter. Mark the cut-off point carefully so the rail will fit snugly into the rail end cup. Any slack in your entire length of rail will allow the chain link, when stretched tight, to pull the end posts in towards each other. Tip: Each piece of rail should be supported by two posts. Do not cut rail so that a seam will be in-between the last line post and terminal post. This point will be weak and tend to sag.
Step 6 - Install top rail in all stretches of fence. At this point, visually check the height of line posts once top rail is installed. If a post is too high, remove rail and trim as necessary.
Fence Tip: If a post is 1/4" too short you may also cut a sliver of pipe, the same diameter size as the line post and slip it under the loop cap.
NOTE: Industrial job sites occasionally substitute a top tension wire in lieu of top rail to cut down on cost. If this is the case, you will need to brace and truss the terminal posts. Read More: How to Brace and Truss Chain Link Fence.
Installing Tension Wire:

Figure 1
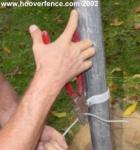
Figure 2
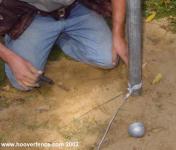
Figure 3
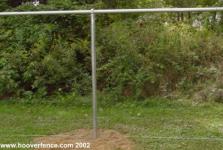
Figure 4
Tension wire may be installed at the top and/or bottom of a chain link fence. Top tension wire helps cut down on cost when used in lieu of top rail. Bottom wire helps deter animals from digging and pushing the bottom of the fabric out. It is frequently used with vinyl coated chain link as this tends to be more elastic in nature. Both types of wire are attached to the chain link, once stretched, with hog rings. It is easiest to install when one person holds the coil of wire upright while the other 'walks' the loose end to the other end of the fence. The next step is to hook up the loose end to the terminal post using a brace band and nut and bolt. The loose end is looped through the bolt and wrapped around the wire itself (Fig. 1 & 2) The tension wire loop is 'sandwiched' in the brace band. Bottom tension wire is installed on the same side of the posts as the chain link fabric (Fig. 4.) Once chain link is stretched, the bottom tension wire will be 'sandwiched' between line/ intermediate posts and the chain link fabric (Fig. 10). If used as a top wire, thread tension wire through loop caps and connect at each terminal post.
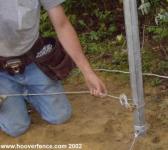
Figure 5
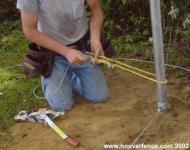
Figure 6
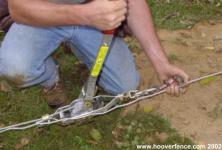
Figure 7
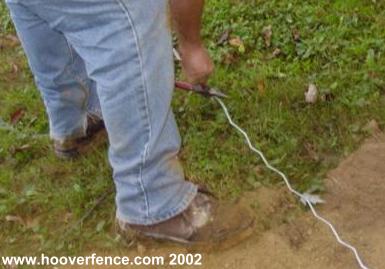
Figure 8
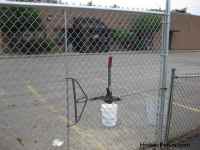
Tension wire is most commonly stretched using a come-a-long and wire grip. Do not wrap the cable of the come-a-long around the post (Fig. 5). This action done repetitively will cause the cable to fray and be destroyed. Instead a 'sling' may be made of rope or cable to wrap around the stretch post (Fig. 6). Release and pull out 6-10' feet of cable from the come-along. The length of cable to pull out will depend on the length of stretch of tension wire. Hook a cable puller to the ratchet end of the come-a-long. Secure tension wire to cable puller (Fig. 7). Crank the handle of the come-a-long until the tension wire is tight (Fig. 7 & 9). Do not tighten too much or post damage or physical injury may occur.
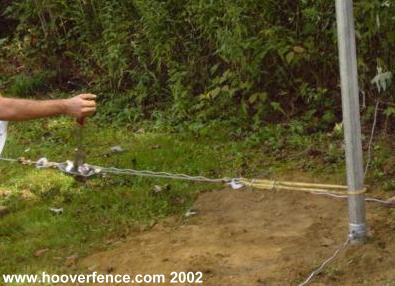
Figure 9
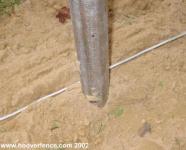
Figure 10

Figure 11
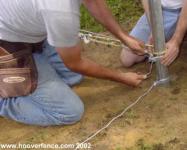
Figure 12
With the come-a-long cranked tight, bend the tension wire where it would loop into the nut and bolt. Next, cut 6-8" past this bend with bolt cutters. Be careful as both ends of the wire will 'whip' from the tension and can be dangerous. Fish the looped end of wire through the nut and bolt and wrap as before. Release come-a-long; repeat process for other runs of fence. Note: Short lengths, approx. 12' and less, are difficult to do using a come-a-long. These are often simply done by hand. The tension wire naturally has crimps in it. With the use of pliers in their open position, these crimps can be crimped further causing the wire to tighten (Fig. 8). Be sure to crimp throughout the length for uniform appearance.
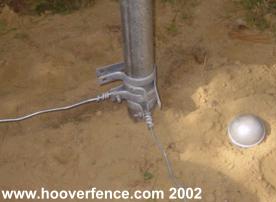
Figure 13
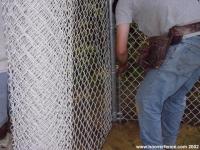
Figure 14
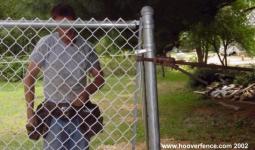
Figure 15
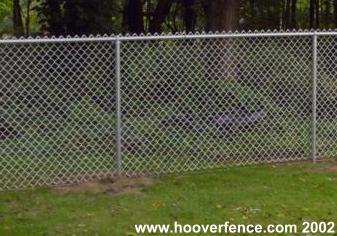
Figure 16
Once tension wire is installed, the chain link fabric may be stretched. Chain link is installed to terminal posts using tension bars, tension bands, and nuts and bolts. Often one end is installed with the roll upright for ease (Fig. 14). The roll may then be laid down flat of the ground and rolled to other end. Additional rolls may be added easily and the weaving is easily done on the flat ground. Chain link is stretched with a come-a-long and spreader bar for longer stretches (20' or more). A pul-jak is used for shorter stretches (20' or less) (Fig 15). As tension bands are installed an equal distance apart, usually the bottom brace band holding the tension wire may be adjusted so that the tension wire is centered on the bottom diamond of the fabric. The top rail, line posts are tied last. Hog rings are installed to secure the tension wire to the chain link fabric using hog ring pliers.
Stretching Chain Link Fabric:

Hook-up chain link fence to one terminal post and roll it out towards other end.
It is best to lay chain link rolls down flat for longer stretches.
Stretch chain link fence using a stretch bar, come-a-long, and a tension bar.
A come-a-long is required for longer stretches of fence.
A pul-jak is the ideal tool for short stretches of fence.

Remove a weave to 'cut' the fabric to the correct length.

Hook up tension bands using 5/16" x 1-1/4" nuts and bolts. Adjust height before tightening.
View of fence from inside: Notice flat side of tension band faces out, nut is on inside.
Tentatively adjust height before tightening nuts and bolts.
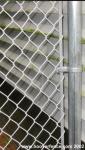
Be sure to center top chain link diamond on rail prior to tying.
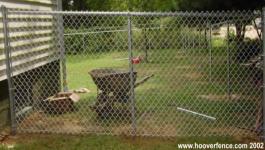
The finished chain link fence.
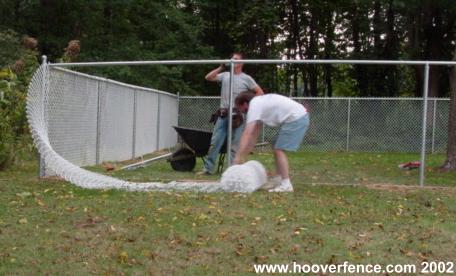
Step 1 - Starting at one end of a line of fence, roll chain link out on the outside of the enclosed area or the side you previously have chosen.
Step 2 - Roll out another roll, if more is needed to reach the next end post. Chain link is stretched in one continuous length of woven chain link from end post to end post.
Step 3 - 'Weave' chain link rolls together. This can be a little tricky, if never done before, and requires some explanation.
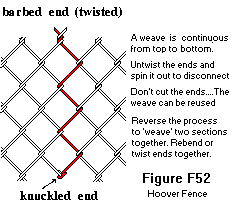
Each weave is continuous from the top to the bottom along the vertical or height of the roll. If you follow the strand, starting at the top, you will see that it zig-zags back and forth to the bottom. It starts and ends with either a 'knuckled' or a 'twisted' end.
To remove a weave, unbend the end of the weave 'knuckle' straight. Unbend the adjacent weave that is knuckled to it. If it has a twisted end, simply untwist the two weaves until they can be separated.
Follow the weave to the other end as it zig-zags back and forth and untwist or unknuckle the opposite end. Be certain you follow carefully, so you undo the proper weave.
At the top of the fence or the bottom, spin the weave in a counter-clockwise direction, as if to unscrew it from the roll. Most newly manufactured chain link spins out counter-clockwise, whereas some chain link manufactured years ago spins out clockwise. Continue spinning and you will see the other end unweaving from it's adjacent weaves. If you are having difficulty, you may have disconnected the wrong weaves at the opposite end. Also check that you have bent the far end straight or it will snag as you try to spin it. Another problem that may occur is the chain link is stretched to tight; give yourself some slack.
The procedure for weaving two rolls together is just the opposite except it can be tricky getting started. It is easiest to weave two rolls together when they lay flat on the ground, however rolls may be wove together in the upright position as well.
To start weaving: Chain link forms squares or 'diamonds' as they are frequently called. You must match two sections or rolls together before you start weaving in such a way that one roll has a full diamond and the other roll has a half diamond. This match will be at the top and bottom of the rolls. When you add a weave, you will end up with a full diamond and two ends to knuckle or twist together.
Many rolls of chain link will have a loose wire in the roll. Use this to piece two rolls together or remove one wire from one of the rolls to splice with. Spin the single weave into the first full diamond. Spin it through the next full diamond of the other roll. Continue spinning and make certain that the weave end goes through each full diamond on each roll in each revolution.
If you have trouble, it could be from one or more of the following reasons: Your chain link is too tight; give some slack. You missed a diamond somewhere; unweave and try again. Lastly. you may have mismatched rolls that came from different manufacturers or the rolls have different mesh sizes; count the number of full diamonds in each roll, they should match in number and size.
After you have successfully woven the two rolls together, twist or re-knuckle the ends together. If you have no counter weave to fasten to, you started with either two half diamonds on each roll or two full diamonds on each roll. Take it apart and try again. Sometimes you have to flip the one roll over (most have a half diamond at one end and a full diamond at the other) or remove a weave from one roll to create a starting half or full diamond.
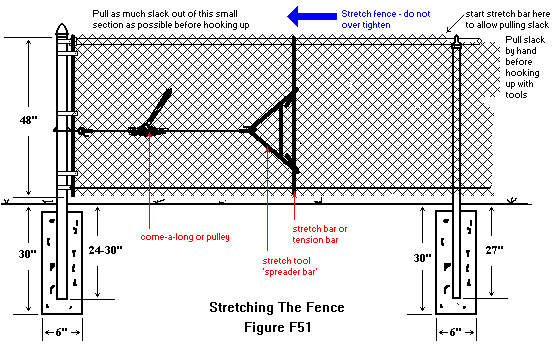
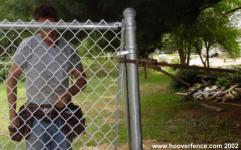
Step 4 - After rolling out the chain link and weaving the rolls together, 'hookup' one end. Space the tension bands evenly as illustrated above (Fig. F51). Make sure the nuts are on the inside of the fence so they can not be removed from outside the enclosure.
If you have a sharp incline approaching a terminal post, the fabric must be cut on the end. This is called a bias cut. Read More: How to Bias Cut Chain Link.
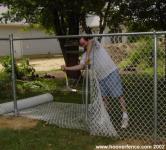
Step 5 - Pull the chain link tight by hand to the other end. You may stand the chain link and lean it against the posts or leave it on the ground and lean it up as you stretch the fabric later. Generally the later is easier and better on long stretches.
Step 6 - Hook up stretch tools as illustrated on inside of fence (Fig. F51). Slide a tension bar 10-12' away vertical in chain link fabric; hook stretch bar to it on inside.
Step 7 - Make sure the come-a-long hook faces away from the fabric or it may get caught in the diamonds.
Step 8 - Tighten the come-a-long slowly. Check that the fabric is not getting caught on posts, tree roots, or other obstacles.
Step 9 - 'Dress' the fabric as you tighten it. 'Dressing' involves straightening the fabric diamonds so they run true. This is vital for heavier gauge fabrics. Some spots will be higher than others as you sight down the top. Lift the fabric in the low spots. This must be done before the fabric gets too tight. Once it is tight, little can be done to straighten the fabric. Some fabric dresses easily, some does not. If the fabric does not dress up properly, you can always loosen the come-a-long and try again. Check top and bottom diamonds for any wires that may bind out of proper shape. Lift and shake fabric to assure an even tension throughout roll(s).
Step 10 - The fabric is stretched sufficiently when you can't squeeze the diamonds together with one hand. Do not over stretch or post damage will occur. The top of the fence should 'snap' back to the posts when pulled out a little.
Step 11 - Hand stretch the small section of chain link left between the come-a-long and terminal post by hand. Remove a weave to 'cut' the fabric to proper length. Slide the tension bar into the mesh and make your last hookup. Once all bolts are in place, remove the stretching tools.
Tying Off The Fence:
Step 1 - Install tie wires onto top rail first to establish the height of the fence. The top diamond of chain link should be centered on the top rail.
Step 2 - Space tie wires evenly and no more than 2' apart.
Step 3 - Tie line posts last. Use the same number of tie wires per line post as tension bands per terminal. This quantity is a minimum of 1 per foot.

Installing Chain Link Gates:
There are many different types of hinges and latches on the market today for use with chain link gates. Most are self-explanatory and do not include a set of installation instructions. Installation instructions usually accompany the more complicated hinges and latches.
Single Swing Gates:
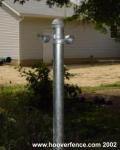
Basic Swing Gate Hardware
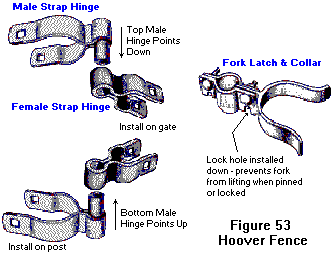
Step 1 - Install female hinges on gates using nuts and bolts. Again, nuts should be installed on the inside of the enclosure. Space them the maximum distance apart as possible.
Step 2 - Hold gate in opening and mark the location of male hinges. Point the male hinge on the bottom up and the one on top down.
Step 3 - Install bottom and top male hinge with bolts. Tighten bottom hinge snug, but leave top hinge loose.
Step 4 - Place gate on bottom hinge and lower top male hinge into female hinge.
Step 5 - If the space under the gate is acceptable. Tighten top male hinge snug.
Step 6 - Test swing the gate to see if it will miss the ground. Adjust as needed.
Step 7 - Tighten all hinge bolts. Do not over tighten.
Step 8 - Install the latch at a convenient height (nuts inside).
Double Swing Gates:
In the case of double swing gates, you will want to install the gate closest to the ground first, unless the ground is perfectly level. Hang second gate level to the first. Although you may 'step' the gates for a tight fit to the ground, it looks best to install them level to one another.
Follow Steps 1-7 from above to hang the gates. After that is done, follow the steps below to latch the gates together.
Drop Rod & Center Stops
Step 8 - Install the double gate drop rod/latch assembly.
Step 9 - Install center stop for double swing gate. Close the double gate, making certain the two leaves are lined up (straight w/ fence line). Mark the ground where the center stop needs to be installed. You may simply use a cut-off piece of pipe as a center stop by driving it into the ground. Proceed slowly, checking the gate to make certain you are driving the pipe straight. You may also use a prefabricated center stop and cement it for a better appearance. If the center stop is in a concrete drive, simply drill a hole in the concrete larger than the drop rod diameter. Be sure to drill clear through the concrete drive to allow water to drain. Always make a much larger hole (or pipe size) than the diameter of the drop rod to allow for gate sag, posts shifting, ice and other factors.
Optional Step - Install Gate Holdbacks if desired. Open gate(s) to the desired 'open' position. Cement or drive a 2" O.D. post a couple inches beyond this point. Install holdback at correct height using U-bolts provided.
Final Step - Install all post caps.
Slide Gates:
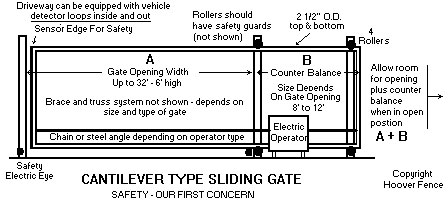
Chain Link Cantilever Gate

Chain Link Rolling Gate
Read More: Chain Link Cantilever Gate System Overview | Chain Link Cantilever Installation Manual | Chain Link Rolling Gate System Overview
How to Install Chain Link Fence Hook Ties
Source: https://www.hooverfence.com/chain-link-fence-installation-manual